
GUIDE TO EMAIL MARKETING
TABLE OF CONTENTS
1 - Why Do Email Marketing?
2 - Getting Started with your Email Service Provider
3 - How to Get Subscribers
4 - Get Traffic to Your Website
5 - Creating an Automatic Email Sequence
6 - Broadcast Emails
7 - Optimizing Your Email Content
8 - Segmenting and Triggers - Sending the Right Message to the Right Person
Email has been around for almost 50 years and while it may be easy to dismiss this form of marketing as outdated when compared to its newer social media counterparts, email still remains one of the most effective tools in digital marketing. If you’re trying to grow your brand or business, it’s essential you’re doing email marketing. Throughout this guide we’ll cover the basics of email marketing. You’ll learn why it’s important for you and how to do it.
Our go-to email service provider is ConvertKit. Many of our tutorials will be showing you how to use different processes in ConvertKit, but if you choose a different provider, that’s completely fine! The methods and strategies we will teach you in this guide can be applied to the email service provider of your choosing.

Get A Free PDF Version Of This Guide
CHAPTER 1: WHY DO EMAIL MARKETING?
Email marketing is great way to grow your revenue, increase leads, and foster loyalty within your audience. Below, we’ll discuss the six biggest benefits of email marketing.
Low Cost: Email marketing is extremely affordable. There are a variety of email marketing services that allow you to create your templates, store contacts, track metrics, and send emails all from their platforms at a great price. If you’re just beginning to create your email list, MailChimp allows you to send 12,000 emails a month for free until you have 2,000 subscribers. As your list grows, they offer bigger packages at affordable prices. As we mentioned above, we use ConvertKit as our email service provider. They’re slightly more expensive than MailChimp and AWeber, but they are currently offering a 14-day free trial.
Simple: You have an email account that you probably use everyday to message your friends, family, and business contacts. Email marketing is pretty much the same. The most effective email are written like you would write to a friend. We use ConvertKit because emails are simple and primarily texted based. These tend to be the emails that people open more often and interact with--not the beautifully designed email flyers that most people know are only sent to sell them something instead of be helpful. With email marketing you don’t need prior knowledge of design or programming.
Reach: When compared to social media, email has the largest reach. If you have 1000 fans on Facebook, 1000 followers on Twitter, 1000 subscribers to your email list, and send the same message to everyone, your email list is much more likely to see your message. With the everchanging ranking algorithms on social media it’s difficult to ensure that your fans, followers, and customers will ever see your updates. With emails, your message is delivered straight to their inbox and your recipients have the ability to actively open it or ignore it. On social media, you’re lucky if you’re reaching a few percent of your followers with any given post. With email, the average open rate is 18%.
Lifespan and Searchability: Emails stay in an inbox unless a person makes the active decision to remove it; at a minimum, this means they at least saw your email name and subject line. Contrastingly, with social media, people often times don’t even have the chance to see your message. Social posts have a lifespan of a few hours to a few days depending on the network, what you post today will hardly ever be seen again a week from now. If the social network didn't show to someone the day you posted it, there is slim to no chance they will ever see that post. Emails ensure your message is staying put until your target audience takes a definitive action. Additionally, emails are easily searchable. If someone saw the subject of your email but didn’t get a chance to read because they were having, but they can easily find it later. Also if your email contains useful information they can easily find it and refer back to it
Designed to Segment: ESPs are designed to help with segmenting your audience. Segmenting is when you can divide your subscribers up into groups and sub-groups based on their interests, buying habits, and more. This allows you send special offers to your top 25 customers or send helpful content to only those you know will be interested. With email, you can tailor your message for a specific audience whereas with social media everyone is always receiving the same message.
Safety Net: A lot of businesses and individuals have large followings on social media or rank high for certain phrases in search engines. While these are great when growing your audience and generating traffic, but what happens if Google, Facebook or Instagram decides to change their algorithms tomorrow? What happened to all the people who built up a large Myspace following? What is their backup plan for reaching their audience? An email list is your property and ensures that you can reach your audience whenever you choose to do so.
Still not convinced on the powers of email marketing? Watch our video on the importance of email marketing.
CHAPTER 2: GETTING STARTED WITH YOUR EMAIL SERVICE PROVIDER
When you decide to start doing email marketing and building your list, the first step you need to take is to find an email service provider (ESP). Due to government regulations, you’re legally required to use an ESP to send mass emails. Using a personal account such as gmail would break the law. ESPs offer a variety of capabilities that your general personal or business email account wouldn’t be able to handle. With an ESP you can send mass emails to an entire email list, set up a series of automated emails, and learn more about your audience through segmentation--we’ll discuss all of these capabilities in later chapters.
When selecting your ESP you should make sure it has the following capabilities:
Can send emails to many people at the same time
List management and segmentation, a feature that allows you add and remove people from your list and to add segments, tags, or groups to divide your audience into specific groups based on their profile or interactions with your business
A way for you to create forms to get email sign ups on your website
Capability to send a series of automated emails when someone signs up to your list and send one-off mass emails to your entire list or specific subgroups of your list.
Enforcement of email regulations such as CAN-SPAM
At TheFigCo, we prefer to use ConvertKit as our ESP. We’ve found that of all the platforms we’ve used, ConvertKit is the most user-friendly and intuitive, but also offers a variety of advanced features. This makes the service perfect for both email marketing novices and veterans.

In this section, we’ll teach you the basics of getting started with your email service provider. Our walk through will be done using ConvertKit’s platform, but if you choose to go with a different provider, you can still use many of the methods discussed with the ESP of your choosing.
Setting up your ConvertKit account is simple and right now they’re offering a free trial for 14 days! After going to their website, ConvertKit will ask you some quick questions to help personalize your setup experience. Some of the things they’ll want to know are:
Are you brand new or do you already have a list and are changing ESPs?
If you have an ESP, which one is it?
Do you already have a website? If so, which platform?
They will then ask you to enter in your personal information to get started creating your account. After your account is created, there will be some remaining details they will ask you to include.
Address: An address is a required field for all ESPs. Anti-spam laws require a physical address to be included on email templates. This is important to keep in mind so that you don’t include your personal home address. If you can, include a business address. If you don’t have a current business address, consider getting a PO Box.
“From” name: This is the name that will appear in your target audience’s inbox. While you may be tempted to include your brand or business name, you should try to avoid it. A best practice for an email “from” name is to include a real name. People like personalization and are more likely to open your email if they feel they are corresponding with a real person. Whether you’re sending marketing emails, customer service emails, or any other type of emails, always make sure you try to personalize the “from” field.
Reply-to email address: This is the address that will be the sender in your audiences’ inbox. You can make this address a name to add more personalization to the email, or keep it more general such as [email protected].
CREATING A FORM
A form is the way you will be able to collect email addresses on your website. On your form you can ask customers to fill in their names and enter their email addresses. Often times, you offer a free incentive such as en eBook, checklist, or video tutorial, in return for someone signing up to your email list.
To get started, all you have to do is click on the “Create Form” button in the navigation bar. ConvertKit will then ask you if you’d like to create a landing page or a form. A landing page is a standalone page with an embedded form that ConvertKit will host for you. This is a great way to get started collecting email even if you don’t have a website yet. If do you already have a website, you can choose to create a single form and embed it on any page on your site.

Let’s say you already have a website. After you select that you’d like to create a form, you are then prompted to select the form style. Within ConvertKit there are three form styles:
Inline: Fits within the content of your page. This option is commonly used to add forms to blog posts, footers, and sidebars.
Modal: Allows you to customize a bit more and are forms that pop up based on timing, exit intents, percentage of page scrolled, or when a different button is clicked.
Slide In: The name says it all. A slide in format slides in a form from the bottom corner of your screen after a designated time or scroll percentage.

It’s important to keep in mind that forms are completely customizable and there is no limit to the amount of forms you can create in ConvertKit. You can change the text and colors of a form, as well as the name of the form in your settings so that you can better track your different forms. You can also decide to switch form formats at anytime!
EMBEDDING BASICS
After you create your form, you can go to the form settings and work to embed your form on your website. Simply click on “embed” and a number of embedding options will pop up.
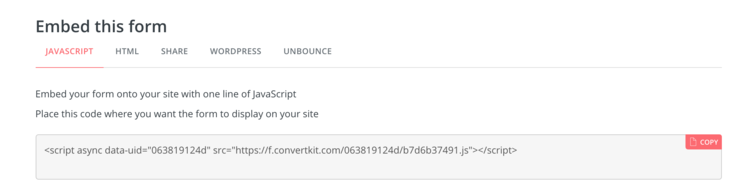
Javascript: Allows you to just take the script and embed it directly on your website.
HTML: is a bit more advanced and is perfect if you have a bit of coding knowledge and are looking to customize your form further.
Share: Allows you to share a link to the hosted version of your form
Wordpress: If you have a Wordpress website, you can you ConvertKit plugin to add a form easily to your site
Unbounce: Allows you to integrate an Unbounce page with your ConvertKit form via Webhooks
Select the embedding form that is best suited to your needs and place it on your website. After the form is embedded in the area of your choosing, you can begin collecting subscribers. Below is an example of our ConvertKit form embedded in the footer of our website.

After the form is embedded, try subscribing to your own list. A default success message from ConvertKit should appear once you enter all the information and sign up to the list.

The success message tells people to check their inbox to confirm to the subscription. This is called a double opt-in. We will discuss the importance of a double opt-in in the next chapter.
UNDERSTANDING YOUR SUBSCRIBER LIST
After you’ve successfully embedded a form on your website, signed up to your list, and confirmed your subscription, you can then view your new subscriber list in ConvertKit. You should see one new subscriber.

If you click on the subscriber name more information about them pops up. You can see their name, what form they’ve subscribed to, and all emails they’ve been sent, opened, the links they have clicked on and the products they have purchased + any tags or segments they belong to.
CHAPTER 3: HOW TO GET SUBSCRIBERS
Now that you have a way for people to sign up to your email list, it’s time to start building your list. The two most effective ways to grow your list is through form placement and incentives.
OPTIMIZE YOUR SITE FOR SUBSCRIBERS
You’re able to place your form virtually anywhere on your website. However, in order to ensure your potential subscribers don’t miss the chance to sign up for your list you should make sure you are optimizing your form placement.
There are seven key places you should make sure you always place an opt-in form:
Homepage: An opt-in form should always be present on your homepage. It’s one of the most visited pages on your website so you should always ensure you place an opt-in form here. Additionally, it’s a good idea to make sure your form is high enough on your page so that people never have to scroll down your page to find it.
Bottom of content: If you are creating written content such as blogs, it’s a great idea to include an opt-in page at the bottom of your posts. After people read your entire post, they will be left wanting for more. Offer them the chance to hear from you more often by placing an opt-in form.
Within a post: If you have an already established blog but are just looking to start building your email list, putting a form within your most popular posts is a great way to begin building your list.
About page: The about page is one of the most visited places on your website. People want to learn about you and what your site has to offer.
Exit: With an exit popup form you are giving one last chance to visitors to your site to sign up for your email address. This is a great way to capture some final email addresses but you will want to be careful with how you implement the form. A service like OptinMonster can help ensure you have the most up-to-date options for opt-in forms, exit pop-ups, etc.
Footer: A footer is a great way to ensure your form is always seen and that people always have the chance to sign up for your list as the footer appears across all webpages. However, it’s important to note this may not be your highest converting form because everyone who makes it to the bottom of one of your pages will see it, but it’s important to have it there because it is where someone goes to look when they want to find your contact info, social media accounts or sign up for your email list. It’s kind of expected to be there.
Landing page: When customers come to your landing page, it’s often because they’ve been brought there by an outside source and that they’re interested in seeing what your site has to over. As a best practice, you should always put a opt-in form on your landing page. As we showed you above, ConvertKit has ways to put forms on your landing page. However, a variety of other platforms also help with form implementation on landing pages. Squarespace is a great option that offers a cover page feature. Cover pages are basic landing pages where you can place an opt-in form. Additionally, Leadpages is an extremely popular landing page software that has special features that allow you to place forms.
FREEBIES
Just asking for someone’s email in many cases isn’t enough. Most people feel they get enough emails as it is. If you want to greatly increase sign ups to your email list, offer something valuable for free in exchange for their email. You’re building relationships here,to start off on the right foot, we recommend giving (in many cases, multiple times) before asking for anything in return. One of the biggest mistakes that people make when adding an opt-in form to there site is asking people to subscribe but not offering any real incentive or value to the subscriber for doing so. Simply asking people to subscribe isn’t enough. You must offer your audience the chance to gain valuable and interesting information from you.
There are a number of popular freebies that are commonly given out on websites in exchange for an email address. Below you’ll find a list of some of the most effective free incentives:
eBook: One of the most popular method for getting subscribers to a list is through offering free eBooks. An eBook come with a lot of perceived value because it’s a electronic book with a lot content on a topic someone is extremely knowledgeable about. However, although eBooks are one of the most popular ways to get potential subscribers attention, it’s not the quickest or easiest option if you’re just getting started. This is because eBook are generally longer, in-depth (10+ pages), and involve some graphic design. Additionally, most potential subscribers are looking for something that will give them instant gratification and not something they will have to sit down and spend a long time with.
Email Course: This is a series of emails that you write ahead of time on a specific topic in order to teach your new subscribers something of value. Once someone subscribes to your list, you will then send these out automatically in a sequence (say 1 lesson/email per day for a week). We’ll discuss how to set up an email sequence in Chapter 5.
Checklist: A checklist is an easy way to peak your audience's attention and they’re extremely easy to create. Think of what you are an expert in and what your audience could use help with. A travel website may offer a helpful packing checklist to potential subscribers. A food blog may give out a useful meal prep checklist. Whatever your niche is, find something you can create and that will be a valuable resource to your subscribers.
List of Tools/Resources: By creating a list of your favorite tools and resources for your audience you’re providing them with something that has been of value to you and can now be of value to them. A list of your favorite books or websites may be all you need to incentivize people to sign up for your list.
Video: At TheFigCo, we love video. Video content can be used in a variety of ways to promote your business or brand and one of those ways is to gain email subscribers. By promising potential subscribers a free video or video series you can peak people’s interest and get them to subscribe to your list. Videos are a powerful method for capturing your audience’s attention and if you haven’t started creating video content for your brand or business yet, check out why you should be doing so here.
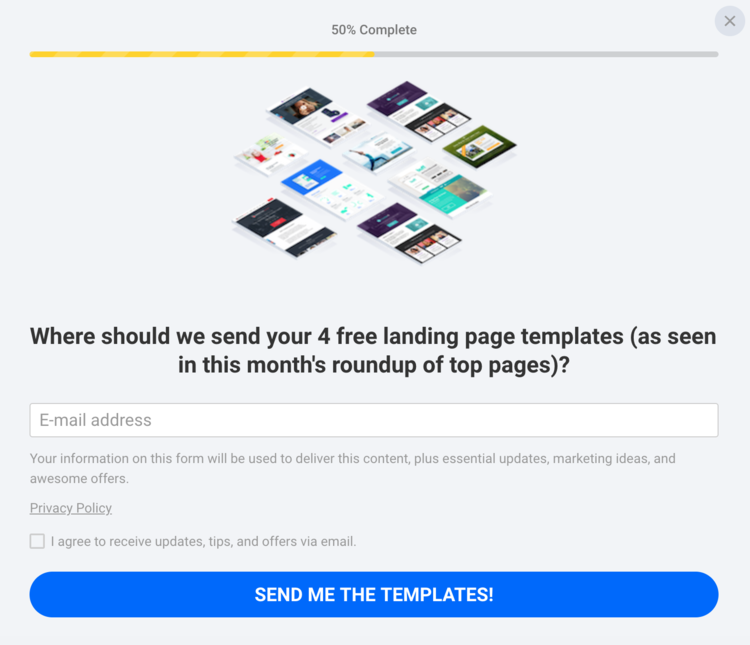
Free Design Resources: This free offering is certainly not applicable to all brands and businesses, but if you have the ability to give away free design resources to your website visitors you will likely be able to convert your traffic into subscribers. Offering free icons, lookbooks with free design ideas, or useful templates can be a great way to capture your audience’s attention. Leadpages is a great website for building and creating webpages and they do an excellent job of incentivizing people to sign up to their email list by giving away free landing page templates. Below, you can see an example of them asking people to sign up to their list in exchange for four free landing page templates.
Infographic: Infographics are a perfect way to provide information in a visually appealing way. A good way to ensure you create a popular infographic that people will want to download is by analyzing your most popular posts. If you have a blog post that has done extremely well, try turning the information in that blog into an infographic. Of course, we all can’t be graphic designers, so if you’re looking for a little help in the design department, Fiverr is a great platform that can connect you with freelancers for a variety of different projects at reasonable prices.
Industry or Market Report: This is not applicable to all businesses or brands, however if you are in an industry where you’ve run surveys, compiling your findings into a helpful report could be a great way to peak people’s interest. You've done the research and people want to gain access to it.
DOUBLE OPT-IN
Now that you know how to get subscribers you need to ensure that you have quality subscribers. When you create your emails we recommend making sure you have a double opt-in. A double opt-in sends an automatic email after someone has subscribed to your list asking them to click on a link to subscribe.
These opt-ins are important because they prevent robots from being able to subscribe to your list and make sure you don’t have any useless subscribers. Additionally, someone on your site has the ability to sign up a friend or family member for your list even if they may not be interested. A double opt-in ensures your subscribers are people that actively choose to be on your list. With double opt-in your list is valuable and has no dead weight.
In ConvertKit double opt-ins are the default. If you are set on removing double opt-ins you must go to the settings of a form you have created and uncheck the “Incentive email” box.

CHAPTER 4: GET TRAFFIC TO YOUR WEBSITE
Now that you have a good reason for people to want to subscribe to your list, you need to find a way to get them to visit your website.
Create useful evergreen content on your blog: Evergreen content is the most important content you can create for your blog. These are the posts that stay fresh and don’t grow outdated as the years pass by, and they also provide the best return on investment as they will continue to be read and be useful to people long after you’ve written them. This type of content brings more traffic to your blog than any other type of content because it’s shareable for years to come. As new readers come across one of your blog pieces, they will be able to share you content with their friends, family, and followers without needing to worry about it being outdated. Additionally, with evergreen content, you run a better chance of having your content continuously shared and referenced by other bloggers and websites as your content remains timeless.
Grow a social following to drive traffic to website:
Find Where Your Audience Is: With so many social media platforms, it’s difficult to try and be on all of them at once. It’s crucial that you try to find where your audience spends the most time online and target them there. For a younger demographic, they may be on Snapchat. However, an older more professional crowd, is more likely to be on LinkedIn We suggest finding the top platform or two for your audience and working to interact with them there. Share content and posts, engage with your followers and in order to bring awareness to your website and email list.
Consistent Content is Key: Creating a consistent schedule for your social media posts or YouTube videos is key if you hope to engage your audience and grow your following or customer base. Additionally, platforms such as YouTube, Instagram, and Pinterest reward their active and consistent users. If your target audience is able to find you online and you consistently provide valuable content to your followers, they are more likely to search out other content you provide. If your social media channels begin to grow at a pace that it’s hard to keep up with and you’re finding yourself spending too much time trying to post on different platforms, we suggest using a tool like SproutSocial to help you manage your content workload. SproutSocial will allow you to schedule content weeks in advance for a variety of different platforms as well as suggest optimal posting times.
SEO: By using different SEO strategies and tactics, you can begin to increase your ranking in different search engines. When you start to appear first searches, you will see a floodgate of new traffic. For the latest and best practices for SEO we recommend checking out Backlinko and Neil Patel.
Create YouTube Videos: YouTube is the 2nd largest search engine after Google. If you create useful video content, you will show up in search results day in and day out. On YouTube and in your videos you can recommend that viewers check out your blog post, articles, or download the freebies you’re offering on your website. Check out our guide to getting started on YouTube here.
Answer Questions on Quora or Post on Reddit: Sites like Quora and Reddit are perfect for interacting with your audience. On Quora, you can help answer topics relevant to your brand or business. When you begin showcasing your knowledge, people will start to see you as an expert and likely search out any useful content you have to offer. Similarly, on Reddit you can create helpful posts about your area of expertise or participate in discussions with other Reddit members. By becoming a resource for people on this platform and engaging with them through discussions you will be able to bring awareness to the other things you have to offer them.
Paid Ads: Sometimes it’s necessary to pay a bit in order to bring awareness to your website. A variety of platforms such as YouTube, Google Search, Facebook, Instagram, and Pinterest allow you to run ads promoting your business or brand. Find the platform that you think will best target your desired audience, and start promoting your site. A great way to pique interest is buy promoting one of your freebies.
CHAPTER 5: CREATING AN AUTOMATIC EMAIL SEQUENCE
An automatic email sequence (also known as an autoresponder) is a series of emails that are prewritten and then sent out on pre-set time intervals or with designated triggers. Common triggers include joining your email list, downloading something from your site, abandoning a cart, or buying a product. Every business or brand should have email sequences set up because they have the ability to foster better relationships with your subscribers by continuously communicating with them.
When to use an email sequence?
As we mentioned above there are a a number of events during which you can utilize an email sequence--new list sign ups, cart abandonment, browsing activity, purchases, and more. However, the first and most important email sequence to have set up is when people join your email list. This series of email allows subscribers to know that you haven’t forgotten about them and that you appreciate them being part of your list.
What to include in your subscriber series?
When setting up a series of emails for people who have subscribed to your list, you want to make sure you include helpful content. These emails will be your audience’s first real introduction and communication with you, so you need to ensure you are providing them something of value.
A list of common types of emails to send in your sequence can be found below:
Welcome: A welcome email should always be the first email in your sequence and sent immediately after a subscriber joins your list. It lets them know you are thankful they’re there and that they can expect a lot more useful content from you in the future. It is also in this welcome letter that you will include your freebie.
Educational: If they signed up for a freebie, such as an ebook that’s normally sent immediately, an email course is sent out over several days or weeks. Also you can plan to send other educational content such as a blog post, video, offer to send other freebies they may be interested in. Let your audience know you’re committed to providing them with lots of value at no cost to them.
Case study, success story - how someone like them has been successful working with you
Survey: These are useful to both your audience and you. Ask them what type of content they’d be interested in seeing more of in the future so that you can create something you know your subscribers will love. Write an email to your audience and say something like, “We create content on A, B, and C. Click on one of the links below to let us know which content you’re most interested in so we know what to send you going forward. Promotional: After you’ve welcomed your subscribers and provided them with useful content, you can let them know about the other things you’re offering that they might be interested in. We suggest giving first and asking later as it takes several interactions with a potential customer before they will even consider purchasing anything from you.
SETTING UP AN EMAIL SEQUENCE
Setting up an email sequence is extremely simple. Follow the steps below to begin setting up your email sequence.
In ConvertKit, head to the “Sequences” section in the navigation bar.
Select “New Sequence” and create a name for your sequence.
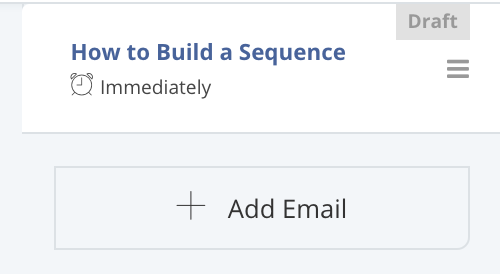
Once you name your sequence, you can begin adding content. ConvertKit will prompt you with suggestions for content as seen below. We’ll also go over content best practices in chapter 7.

4. Select when you want to send your email. As this is the first email you’re sending your subscribers you should select 0 days so that it will be sent immediately. Here you can also select the days of the week you want your emails sent on. Depending on your audience some people choose not to send emails to subscribers on weekends, but others have lots of success sending emails on the weekends when people are less distracted with work.

5. Write the welcome content for your first email in the sequence.
6. Decide what content you’d like to send in the next email and click the “Add Email” button in the sidebar.
7. Create the content for your second email. We suggest sending your first few emails a day or so apart and then spreading out the frequency as the sequence goes on.Continue setting up emails in the sequence until you are satisfied with the content.
8. Switch emails from “Draft” to “Published”
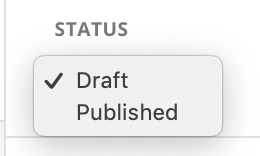
Those are the simple steps to creating an sequence in ConvertKit. You can then have your sequence automatically sent out by creating automation rules and connecting your form to a tigger. Triggers and automations will be discussed in chapter 8.
Once someone finishes the initial sequence for what they signed up for, you may want to reach out to them again in the future, for that we have broadcast emails (or you can have everyone that finished one sequence be added to another)
CHAPTER 6: BROADCAST EMAILS
Broadcast emails are one-time emails that are sent out at the same time to your entire email list or a specific segment/group. Unlike a sequence you don’t send them out in an automatic series when triggered by a certain event, but when you manually select a specific time and date.
Sequences are sent out at specific times based some action, sign up, read previous email, clicked a previous link. You could sign up for a form today and get the first email today, I sign up for the same form a week later and on that day a week later I get the same email you received a week earlier. Broad cast emails are different where you decide to send everyone on your list or maybe everyone who signed up for a specific form the same email on Friday at 3pm
WHY AND WHEN TO USE A BROADCAST EMAIL
Broadcast emails should be thought of as announcements. There are a variety of announcements you may want to make to your subscribers. Below are just a few examples of what you could send as a broadcast email.
News/Updates: Anything new and exciting going on in your business or life? Do you have a project update? Any fun events coming up?
New Content: If you publish new blog posts, videos, etc. let your audience know. Send them an email with a link to your new content and get more traffic to your website.
Questions: Ask your audience for insight. What content would they like to see more of? Is there a specific subject you can help them with? What do they wish would be improved?
Promotions / New Product Launch: If you have a new product available on your website or if you’re offering a discount on one of your products or services, send it to your list. As they say, “the money is in the list”.
Problems or Issues: If you have issues going on in your business that is affecting the content you can put out, let your audience know. Maybe your website is down or you’re having some little technical issues, let your audience know.
Bonus Tip: If you want to add another email to an old sequence, only new people that enter the sequence will get that email. Subscribers who have already finished the sequence will not get the next email added to the sequence. You can add a new email to a sequence and send a broadcast message to people who have already finished the sequence that way everyone who previously signed up plus new signups will get the new email.
HOW TO SEND A BROADCAST
Broadcast emails can be easily set up. See the steps below so that you can begin sending your broadcast emails in no time.
1. In ConvertKit, head to the “Broadcast” section in the navigation bar.
2. Select “New Broadcast” and create your broadcast name.
3. You then select who you would like to send your email to. ConvertKit offers advanced features and allows you to select a specific subset of your audience by filtering with segments, tags, etc.. We’ll go over how to segment your list in Chapter 8. The default setting is to send to all subscribers.

4. You then decide on your subject line and content of the email. In the next chapter we’ll go over for email content best practices.

5. Click next step and then you’ll see a preview of the email and be able to select when you would like to send your broadcast. You can schedule it for later, send it immediately, or save it as a draft to come back to later.

6. Click send broadcast button to send your email!
Bonus Tip: After you’ve sent your broadcast email, you can resend the same broadcast to unopens. All you have to do is go back to your original broadcast. We suggest waiting 72 hours to ensure your list has had enough time to get to your email. You’re then able to see your open rate. ConvertKit makes it simple to resend to unopens. Just click on the “resend to unopens” and modify your message slightly to something like “I’m not sure if you got my last email…”

CHAPTER 7: OPTIMIZING YOUR EMAIL CONTENT
Now that you know how to send different types of emails, it’s important to ensure you’re optimizing your content. Below are key best practices to keep in mind when sending emails of any type.
Subject Lines: Keep your subject lines under 60 characters. Long subject lines tend to lose reader’s attention and also get cut off on their computers or phone screens. In order to make sure your subscriber knows exactly what you will be discussing in your email, keep the subject short and to the point. Each audience is different in what they’ll find most engaging, so it’s a good idea to test out different subject lines and monitor their open rates.
Personalization: Make sure you always personalize your emails by including the subscriber first name or both first and last name. ConvertKit has a great feature that allows you to personalize your emails to all subscribers simply by clicking the “PERSONALIZE” button in the dropdown section of your email.

Paragraphs:Make your paragraphs 1-3 lines. Subscribers that see long paragraphs will be likely to only skim the content. Keep your paragraphs short and concise. Another way you can make sure your paragraphs are not just skimmed over is by creating a wave pattern with your sentences. Create long and then short sentences and alternate them throughout the text. It’s easy for your audience to read and peaks their interest.
Links: When including links always put a call to action above a link and place your link on it’s own line. By placing the link on a separate line grabs the reader’s attention. Additionally, try and work your link into multiple places throughout your email so that if they miss the first one, they will be sure to use the second one. ConvertKit allows you to easily embed a link by simply clicking on the icon shown below.

After you click on “Insert link” you can then choose the link and the text. If you’d like the text to just be the link, the link itself will appear in the email. If you’d like to to write something like “click here,” and then have “here” lead to the link change your text to “here.”

Choose open link in new tab, that way their email remains open and they open your link in a new tab.
Additionally, it’s a good idea to tag subscribers to track who has clicked on which link. We’ll go over how to tag and segment your subscribers in the next chapter.
CHAPTER 8: SEGMENTING AND TRIGGERS - SENDING THE RIGHT MESSAGE TO THE RIGHT PERSON
As you consistently produce new content not everyone will be interested in everything you have to say. Segmentation divides your audience up into specific groups based on their interests and interactions with your business and allows you to send specific messages to the most relevant audience. It’s the perfect way to ensure you’re sending the right message to the right person at the right time.
EFFECTS OF SEGMENTING
Open Rates: When you begin segmenting your list, you’ll see open rates dramatically increase. This is because your subscribers are only receiving the messages they’ll most likely be interested in. The average open rate in 2018 was 18.1%. However, by properly segmenting your list and sending different messages to specific segments you’ll see a huge increase in open rates.
More Likely to Make Money: By sending products and services targeting the audience most interested in purchasing them, you’ll more effectively convert someone from being an email list subscriber into a customer or first time customer into loyal repeat customer.
WHY SEGMENT
Segmenting is a great way to better understand your subscribers. Just as you are producing a variety of content on your website, you will have subscribers with varying interests, skill levels, behaviors, and sometimes even languages. Segmenting allows you to ensure that you send the messages that will be of the most use and interest to your subscribers.
Interests: If you run a fitness blog, you know that not all of your visitors will be looking to lose weight. Some may be interested in bulking up, while others want to train for a marathon. Sending the same content to these different groups of people will make them lose interest. Segmenting allows you to target specific groups with content that is tailored to them. When they open their email they will find value in what you’ve sent.
Level of Knowledge: Another reason to segment is to account for varying levels of knowledge or skill sets. A website that provides computer programming content wouldn’t want to send the basics of getting started with HTML to an already advanced programmer, and a beginner might be scared of by too advanced content. With segmenting you ensure you’re sending the most helpful content to each subscriber.
Type of Client: With segmenting you can also account for subscriber behavior. If your a business or brand that offers both free and paid content on your site, you will want to know who your top customers are and who are the people that only consume the free content. This allows you to tailor special offers and promotions to those you know will actually use them and find use out of them.
Language: At TheFigCo, we have some subscribers that are Spanish speaking and some that are English speaking. We obviously wouldn’t want to send a Spanish email to an English only speaking person and vice versa. When you segment your audience you can ensure each subscriber gets the appropriate email.
HOW TO SEGMENT
There are two main ways you can begin segmenting your audience. One way is by tagging users that click on certain links. This allows you to better gain insight into the content that is of value to them. You can also segment your subscribers when they take specific actions such as purchasing an item from your website, signing up for a course, or downloading an eBook.
LINKS TRIGGERS
If you’re creating new content, it’s a good idea to begin segmenting your users by sending an email with a link to the content. Through link triggers, you can track the people who have clicked on certain links to better understand the items they are interested in.
For example, a music blog who has written an article about hip-hop music should send an email out with a link to their article. Those who click on the article are obviously interested in hip-hop music and would likely be interested in receiving more similar content in the future. Whereas, an article on country music may be appealing to another set of subscribers. By using tagged links to track your subscribers you can begin to better understand their interests, behaviors, and skill sets.
To create link triggers, go to “Automations” in the ConvertKit navigation bar. Once you get to the page for automations, click on “Rules” and then click the “Add Rule” button. You will then be taken to the page where you can create rules for a variety of different actions.

To group the people that click on a certain link into the correct group, you will need to select the trigger as “Clicks a link.” Input the name of the group you are tracking and then the appropriate destination URL. Then, in the “Action” section, click “Add tag.” Create a tag for your group. You can number your group

SEGMENT SPECIFIC ACTIONS
Not everyone on your email list will click on the differing links you provide. Another great way to get people to segment is through segment specific actions. When someone on your page takes an action such as enrolling in a course, downloading a specific guide, or making a purchase you can automatically tag them.
As an example, at TheFigCo, we may want to create a guide for building your brand through social media. We could then put the guide on our website and those that download the guide would be given a tag for those interested in social media.
One way you can set up segment specific actions in ConvertKit is to create a new form. You should then rename your form based on what action your group will be taking and edit the text in the form to better match what you’re offering your audience.
After you’ve created your form, simply go to “Automations” in the navigation bar and then go to “Rule” and “Add Rule.” You then select the appropriate form and add an action to tag the user.

Now, save the rule. It will create a visual automation so you can see what the process is like for your users. If you are satisfied with the flow, embed the new form on your website.
As you create different material that can be downloaded, you will be able to create a unique form for each topic and tag and segment your customers accordingly. For example, if you have a guide on the basics of podcast and a guide on the basics of getting started with YouTube, you can create two separate landing pages with with unique forms and then segment your customers based on which form they signed up with.
ASKING YOUR AUDIENCE
Since you’ve been a child, you’ve always been told it doesn’t hurt to ask. The same lesson applies with your subscriber list. If there are specific things you want to know about your audience, ask them.
Are they looking for one-on-one coaching? Are they interested in more free content? Would they like to sign up for a course?
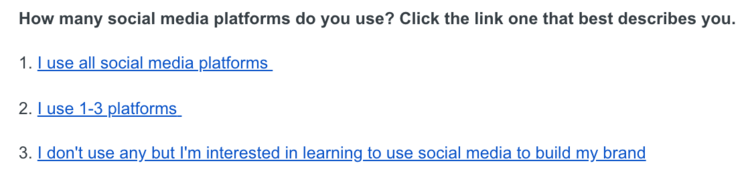
Create a broadcast email containing your questions send it out to your entire list. A good way to do this is to ask your audience what content they’d be interested in seeing more of or what best describes them. From this, you can gain insight into their interests or skill level.
Within your email, create introductory content and let your audience know that you want to better serve them. Then provide different links for each group and ask your audience to click on the group that most sounds like them. Below, you’ll see an example of what we could send out in order to assess our subscribers’ basic knowledge of personal branding.
After you’ve created a draft of your email, you will need to create separate simple landing pages for each group. These landing page links will be used to tag and track your customers. The page can be simple and say “Thanks for letting me know. I look forward to better serving you”.
We hope that you’ve found this guide useful and that it’s given you the help you need to get started with email marketing.
If you’re interested in learning more about how you can grow your business or brand, visit our Youtube Channel. We’ve created a variety of free videos aimed at helping you create a successful grow your business or brand online.
If you don’t already have a website, we encourage you to sign up for our free Squarespace course where we’ll teach you everything you need to know to get your website up and running.